If you’ve been using your Breville for awhile, there’s a good chance you aren’t maximizing the espresso quality. I’ve used almost every Breville model and learned several tips to use a Breville espresso machine to get the best espresso.
It comes down to utilizing advanced features for grind adjustments and brewing. These simple things apply to any Breville model, and aren’t obvious from the manual. You’ll be surprised how much more you can do with your Breville espresso machine.
These tips assume you know the basics of dialing in espresso and how to use a non-pressurized basket.
Tip 1: Adjust Your Inner Burr (inside the hopper)
The most common complaint I get from Breville users is “espresso flows too fast, no matter what I do.” Even after going to the finest setting, espresso still flows quickly. If that’s you, adjust your inner burr, the one inside the hopper.
Many people don’t realize there are more grind settings than what’s on the outside dial. You can actually make a “macro” adjustment on the burr inside the hopper.
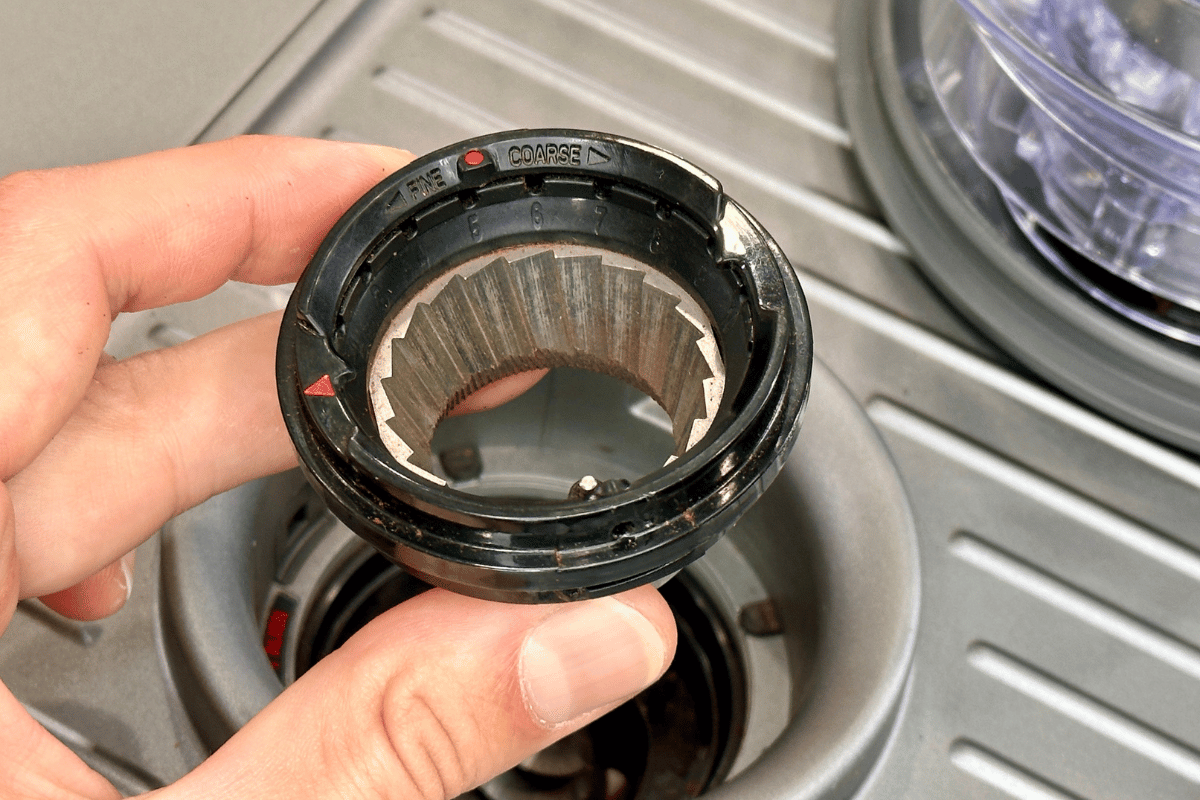
To adjust your inner burr:
- Remove the hopper from your grinder.
- Remove the burr inside (there is a wire on the burr that you can lift and untwist).
- Once that outer burr is out, take off the metal outer ring.
- Now, here’s the magic: rotate the outer column to a finer setting. You’ll see numbers in there – tweak it one step at a time.
This small move is a macro adjustment that brings your burrs closer together, transforming a one grind size into more like a five grind size for a Breville Barista Express, Pro, or Touch model.
Even if you’re comfortable with your grind size, you should still consider adjusting that inner burr inside the hopper. That is because your burrs will season over time. This happens as the edges wear a little, which naturally makes your grind size coarser. We’ve found the seasoning is most pronounced on the first few pounds of coffee. So, you’ll need to change your grind size finer after a few months of use.
I would encourage anyone to challenge themselves to grind a little finer. The crucial point is the “choke point” where your espresso doesn’t flow. The most interesting grind settings will be just before this choke point, where you see a dramatic change in flavor over those few settings. It’s best to grind there.
In summary, don’t be afraid to tweak your inner burr. And remember, as your burrs season, your grind size changes.
Note: this is a great time to clean out your grinder! Vacuuming out all the grinds is a simple way to get better espresso.
Tip 2: Preheat Your Brew Head and Portafilter
To ensure a top-notch espresso experience, you must preheat all your brewing equipment, including your brew head and portafilter. While espresso machines like Breville start very quickly, the “ready” light only means the internal heating system is hot.
However, the brew head and portafilter are not heated. That cold metal will sap energy and reduce your extraction. Your espresso will result in a sour and dull taste.
Newer ThermoJet machines like the Breville Bambino, Pro, or Touch machines absolutely need further pre-heating. While the new ThermoJet starts in three seconds, it’s too efficient. Ironically, it negates some of the benefits of a fast heat-up time!
Preheat is simple: run a blank shot. Lock in an empty portafilter and run water through it to heat up the brew head and portafilter. That will heat the brew head and portafilter.
One handy trick I use is to reprogram your one-cup button to run for about 15 seconds – ample time to achieve the right temperature.
The vast majority of users (rightly) use the two-cup basket only, which leaves room to make your one-cup button your go-to preheat/flush option.
Bonus tip: Invest in a bottomless portafilter for easier cleaning, as spouted ones tend to collect water inside! I really like the bottomless portafilter for cleanliness. You can see my favorite 54mm bottomless portafilter here.
Side note: I do not preheat my cup. Many do, but I do not. Preheating the cup gets into a debate about volatile coffee compounds, but given the recent popularity of compound chilling, I think keeping a cup at room temperature is perfectly fine.
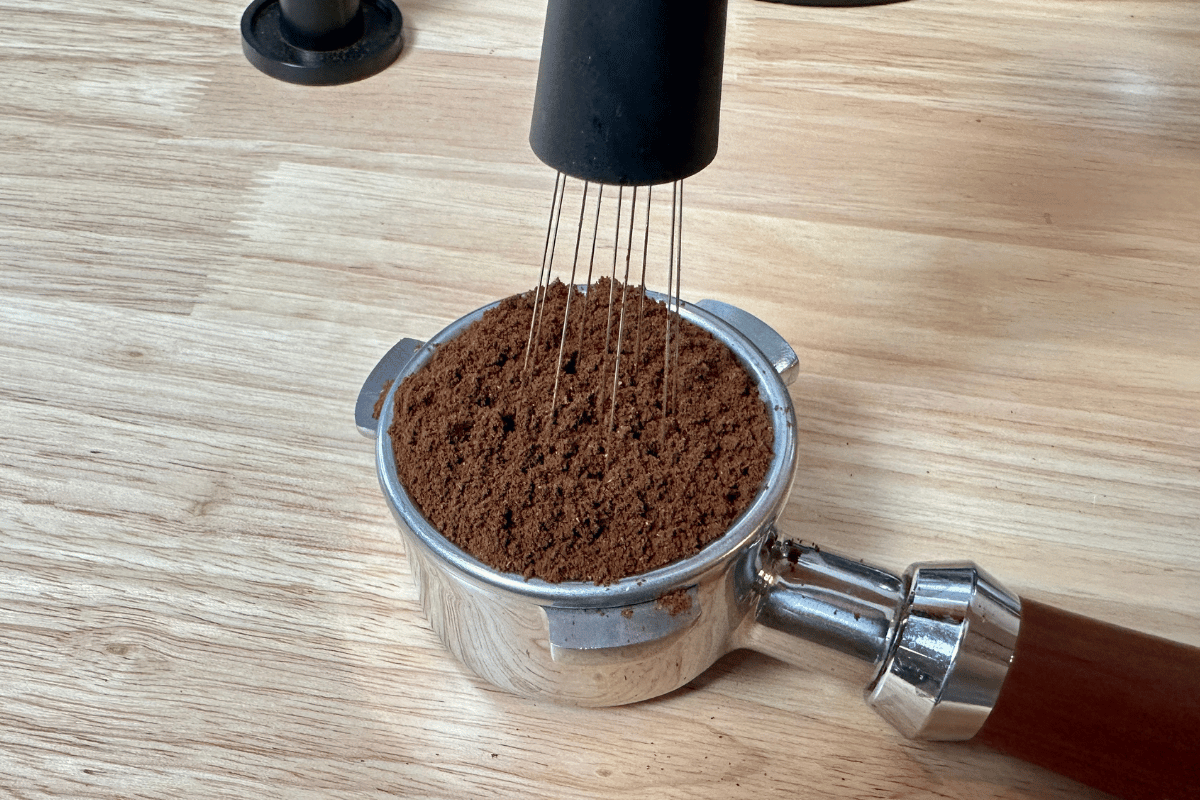
Tip 3: Elevate Your Espresso With WDT
If you’ve followed Craft Coffee Spot, you’ve seen us use “needles” to stir up coffee grounds. This is the Weiss Distribution Technique (WDT) used to break up clumps. This evens out the espresso puck, reduces channeling, and gets a smoother flavor.
WDT is really important for Brevilles, as the integrated grinder makes clumpy grounds due to heat and static electricity, especially with fine grind sizes. Water goes right around these clumps, leading to uneven extraction. Your espresso will taste sharp and unbalanced due to these clumps.
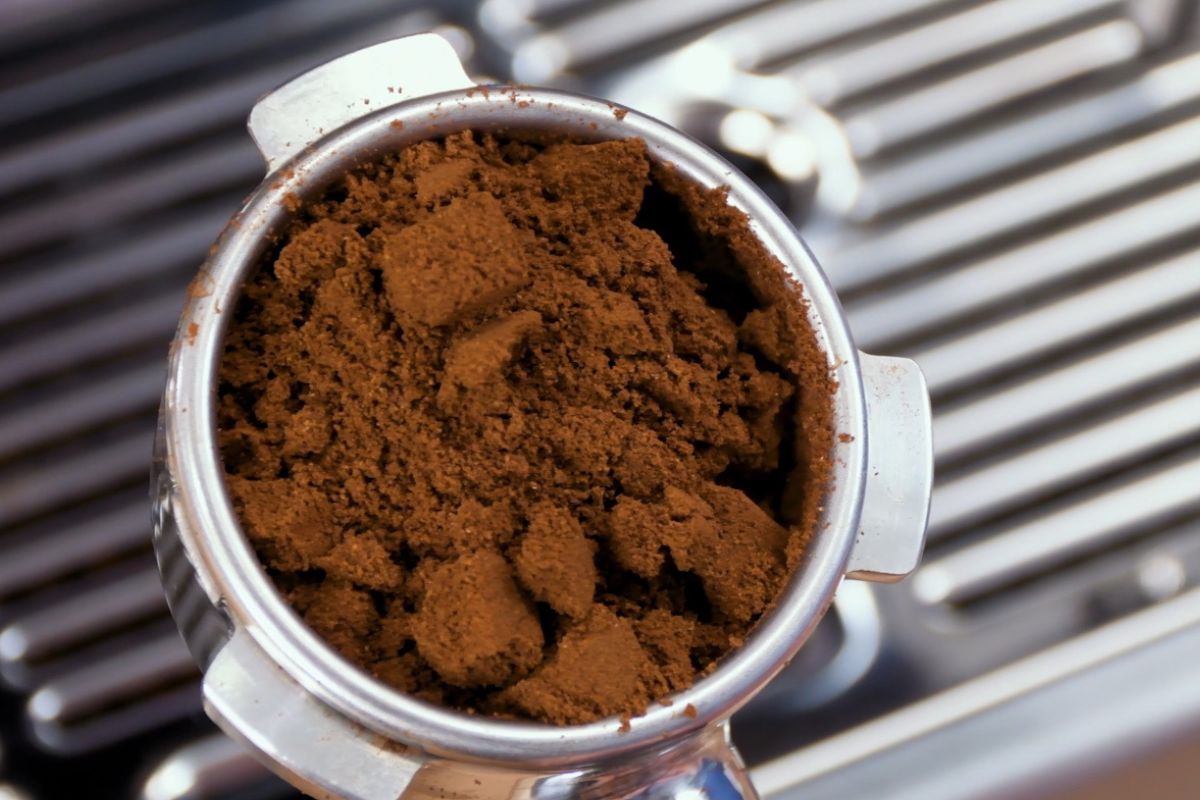
The solution? Use a WDT tool to stir up your coffee grounds before tamping.
There’s no magic in “how” to WDT. Just stir a bit to break up all the clumps. It’s a simple step that can drastically improve your espresso.
WDT tools are very affordable, and you can even make a DIY version using a wine cork and needles. We have a full article on WDT, and here’s our favorite WDT. Your tastebuds will thank you!
Tip 4: Enhance Your Espresso With Extended Preinfusion
Let’s talk preinfusion – the start of your espresso shot, where the machine runs a bit slower at about two bars of pressure. This low-pressure phase saturates the coffee, allowing carbon dioxide to escape for a smoother extraction at full pressure.
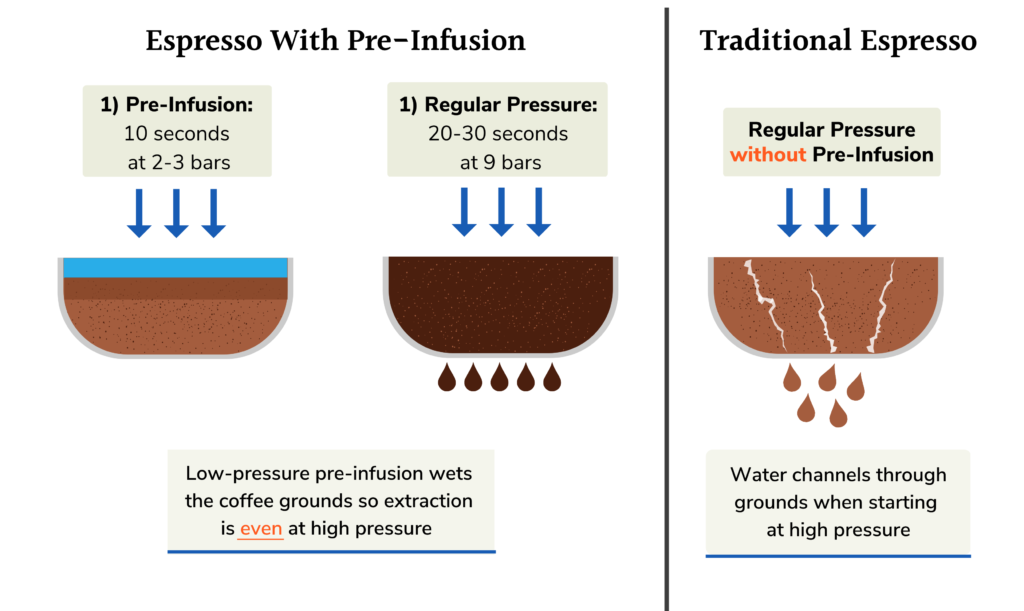
Breville machines all have a low-pressure preinfusion, which is great. However, the default time is 3 to 7 seconds – a tad short.
Extend your preinfusion to 10 seconds for a more balanced shot.
It’s easy to do this: run a manual shot by holding down the button. As long as you hold it, the machine stays at low pressure. When you let go, it transitions to full pressure.
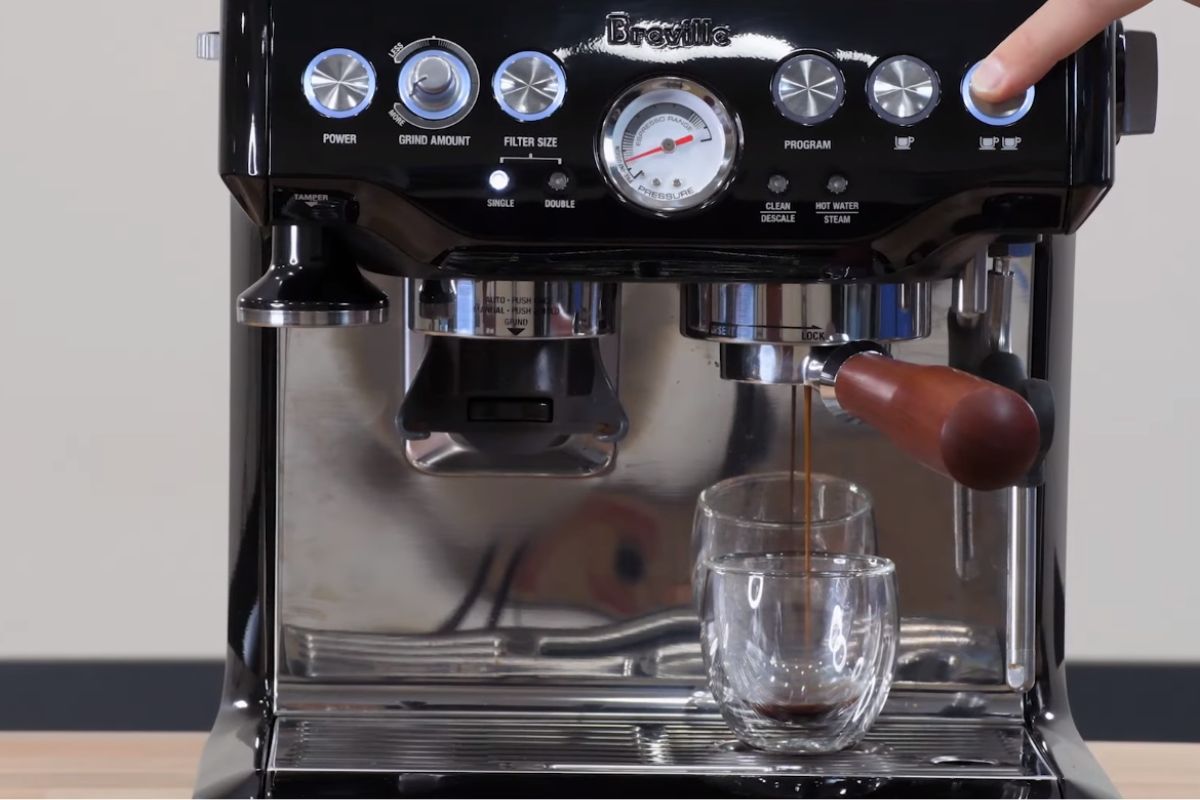
For Barista Pro users, you can max out at 10 seconds, while Breville Express, Infuser, and Express Impress users can go as long as they want. Bambinos max at 7 seconds.
Note: you cannot extend pre-infusion on the Barista Touch.
This tip is one of my favorites because no extra tools or work are required. Just hold a button. Try extending your preinfusion for a richer, more balanced espresso experience.
Tip 5: Fine-Tune Your Espresso With Water Temperature
Water temperature is an often overlooked factor in perfecting your espresso. It can be a great tweak to improve your flavor.
As a rule of thumb, if your espresso leans towards bitterness, use cooler water; if it’s too sour, go hotter to increase extraction.
The good news is on almost every Breville machine, you can adjust the water temperature. However, it’s not very intuitive, and most people don’t know how to do it. I’ll go through each one below:
- Breville Barista Express: turn off the machine, hold the program button, push power, and select a button for water temperature (left for coldest, right for hottest).
- Barista Express Impress: turn off the machine, Press and hold ‘Filter,’ 1 CUP and 2 CUP, then push power. Now, select a button for the water temperature button (left for coldest, right for hottest).
- Barista Pro: hit the menu button, navigate to the side, and adjust the water temperature by pressing the dial.
- Barista Touch: use the settings icon on the touch screen.
- Breville Infuser: turn off the machine, hold 1 CUP, and press power. Then use the 2 CUP button to cycle through temperature settings (left for coldest, right for hottest).
- Bambino / Bambino Plus: unfortunately, you cannot change the water temperature 🙁
Keep in mind that water temperature is not a silver bullet. Adjust your grind size and dose first, as those have a bigger impact on your espresso.
However, if you’ve been using your machine for a while and use the same beans, you will notice a difference from changing the water temperature.
Bonus Tip: Dial In Your Espresso To Taste
Here’s a crucial bonus tip: dial in to taste. While there are plenty of suggestions out there (including the ones I’ve shared), the key is to adjust your espresso based on what YOU enjoy. Your choice of beans, water, and your unique palate make your coffee experience distinctive. There is no “right” grind size, nor ratio of coffee-to-espresso.
However, taste is subjective and nuanced with espresso, especially when terms like bitter or sour are thrown around. Remember, some level of bitterness and sourness exists on ALL coffee, which is what makes coffee intriguing!
One way to refine your palate is to pull two different shots. Use the same coffee dose and grind and change the shot time. The first one should run shorter (around 20 seconds) and the other longer (about 40 seconds). Compare the two espresso to understand the extremes of flavor. The first should taste full (high body) and sour or acidic, while the long shot will be thin yet bitter and astringent.
Another valuable tip is to track your shots. This is why I am so big on using a coffee scale with timer. I recommend tracking dose in, espresso out, grind size, and shot time. These are important parameters to measure…along with flavor!
Knowing the details of what you’ve brewed helps you figure out what you like. For instance, if 18 grams of coffee produced 36 grams of espresso in 25 seconds, and it tasted a bit sour, you need a longer shot or finer grind to increase extraction. Try getting 40 grams of espresso out or grinding one step finer for a 30-second shot.
By incorporating these tips and tracking your progress, you’ll continually enhance your Breville espresso experience. Happy brewing!